Recent Posts

onsdag, januar 27, 2010

My stuff is at CHA!

Yes it is CHA winter 2010 over in Anaheim these days, and we hear talk about cha, and we see sneaks of new collections all the time.
SO much new, yummy stuff. :)
Wish I was there, attending the show - it all seems to be so fun.
Anyhow, this year I'm SO HONORED and HAPPY to have some of my stuff featured at the BEST boot: Cosmo Cricket. :) ( i have seen some pictures, and the boot is SO cute. :) )
They have some WONDERFUL new lines- and have you seen the new chip letters? They are to die for! Love them all :)
I'll share some NEW LOs I've made with the new Cosmo lines, and some of the stuff featured at CHA.

Have a great evening.
xo


mandag, januar 25, 2010

inspiration Monday #4 - so many photos, so little time -

Hi my friends.
A late inspiration monday for you today....

I have been looking trough some of my pictures from 2009 - and yes, there are some....
I don't know how many thousands....
I also dug into my LOs from 2009 - and I found I made about 400 LOs and minialbums in 2009.
...and STILL there are photos (a lot of photos) not scrapped, and happenings not documented....

well, to be honest, the reason why I scrapbook is not so much for documenting the life of my kids and family....it's more about my creative process....
Anyhow, I like to document, and gather memories too.... I love to look at the LOs from years back and remember - get into the memories - smile at things long forgotten.

So after digging in to all my photos I realized it is just TOO many photos ..... and too little time to scrap them all....

I have discovered envelopes are on their way in to scrapbooking again - this makes me happy :)
I love envelopes. They are so useful, so versatile and add a new, hidden dimension to the scrapbooking LO :)

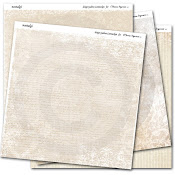
On this LO I have made an envelope of one of my favorite patterned papers, and today I want to share my envelope-idea with you.
Maybe you have too many photos too??


Here is my LO - pictures from summer 2009.
I love to make photo-collages, and I often use flickr-toys, mosaic-maker at Big Huge Labs. Works perfect if you want to make a mosaic like the one I have on this LO :)

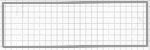
Here is the sketch I made for the envelope.
The envelope is made out of a 12x12 inch patterned paper, so I just used my sketch as a guide when I folded the envelope.

For this project I used:
1 white bazzill cardstock
1 smaller piece of cardstock
Studio Calico, Home Front collection
glimmermist: (turqouse) my tattered angels
2 buttons
embroidery floss
butterfly punch
(rubons: Hambly and Autumn Leaves (stitches))

So, let's get started :)

Fold 3 inch in on both sides, 2 inch in on the top and 1 inch in on the bottom of the 12x12-paper you want to use for your envelope.
Use the sketch as a guide.
You can make the envelope in what size you prefer.

Cut away the corners of the 12x12 paper (see sketch)
The envelope is ready to be glued.
I prefer to use doublesided tape.
I glue the middle part and the bottom, leaving the top open. I want to put more photos and memorabilia inside my envelope :)

To close the top of my envelope I sew on two buttons. One button on the lid, and one on the envelope-front. I use a little piece of embroidery floss and tie a little bow between the two buttons. :)

The envelope is now ready.

As you know I used mine on my LO. You can use it in a minialbum, as a envelope (surprise! LOL), as a LO on it's own, or how ever you prefer.

I'll show you how I made the rest of my simpleLO :)
To add some color to my white cardstock, I added my favorite, turquoise glimmermist.
Let the cardstock dry.

Now I added my envelope, the pictures I preferred to use on my LO, some butterflies as embellishment and my title.
I put the "leftover" photos on a large tag, with room for more photos or journaling on the back.
This tag fit perfectly inside the envelope.
I have more photos in all sizes and other memorabilia I'll tuck in my envelope too. :)
Voila!
1 LO with all the photos and memories from our summer at the south coast of norway 2009 :)

Hope you enjoyed this little inspiration Monday.

Thanks for popping by!! :)
xo

torsdag, januar 21, 2010

busy, happy thursday


Hi my friends.
It's still snowy and grey in Oslo. So if you plan on visiting the capital of norway....save you plans for a day in may or june....when the city will smile again after this vinter-sleep.... ;)
LOL
Well, I love this city, where I was born, anyhow. I love it winter or summer....
But as I am a summer-person, I rather show you my city wearing a summer dress.
This little album is a tribute to Oslo - the way I like to see it.
I'll use this album in a class this spring too
"rett på"
I'll teach this class at Minnehjørnet (Ski) february 4th.
:)
Hope to see some of you, my norwegian friends there.
Have a great day.
xo


onsdag, januar 20, 2010

winter storms and summer pictures... :)

Weather in Oslo is awful today. Snow and a ice cold north-wind. Brrr.
So what better time to dive in to all the warm and beautiful memories of summer.
I created this LO inspired by the January 2010 Lift over at Cocoa Daisy.
Had so much fun using my glimmer mist and my shimmerz paint on this LO :)
Added some of the awesome NEW chip-letters and patterned paper from the brand new line "material girl" by Cosmo Cricket. Love these new lines SO much!

And here is a mini-album I made for one of the classes I'll teach this year.
"Kreative Krumspring". :)
I'll teach this class at Minnehjørnet (Ski) tomorrow, at Kongsberg (KOKOS) the 7th of february, and in Tønsberg, Gode Minner, on valentines day (!) 14th of february.
I'll probably teach this class at Steffens, Oslo this spring too ;)
For you, my norwegian friends: I would LOVE to see you in my classes :)
I think this will be SO much fun!!


Have a great day!

xo

mandag, januar 18, 2010

Inspiration Monday #3

Hi my friends, and welcome to this weeks Inspiration Monday. :)

Like so many of you I love to travel, and I hope I'll be able to travel some places in 2010.
The album I'll share with you today Is a little accordion-album with places I will go and places I dream of in 2010. The album is made from scratch, very simple and fun. You can also use a pre-made accordion album. :)


Here is what my album looks like. It is aprx 6" X 5,5" (inch)

Just let's get started :)

What you'll need:
*2 sheets of 12"X12" craft cardstock
*Scraps of your favorite patterned paper, stickers, chipboard etc. I used all "boyfriend" by Cosmo Cricket, and some aof the COOL new chip Letters :) :)
*6 Photos
*double sided tape
* piece of ribbon and a button

Cut your cardstock in 6"X6" (inch). I used 6 pages for my album.
Score and fold 5 of your pages at 1/2 inch. For the last page you'll cut away this 1/2 inch. No need for the fold, because you have no more pages to add ;)
Use you double sided tape and glue all the pages together, until it looks like an accordion. :)
Add your pictures to the pages.

Now you are ready to add all the pieces of patterned paper, embellishments and titles.

When your Album is finished on the "inside", you cut 6 pieces of patterned paper to cover the back and covers of your album.
Add all the patterned paper to the back of your album.
My cover is pretty simple: just some patterned paper, chipboard, journaling-spot, ribbon and a button to embellish.
here is the back of my album. :)
And all the pages:


Hope you had a great time joining the inspiration-journey with me today.
And please, If you make an album inspired by this tutorial, leave me a note, I'll LOVE to see it :) :)

Have a great week!