


Recent Posts
tirsdag, desember 30, 2008

Winterwonderland :)

Just a quick post to say HI all! hope you had a wonderful christmas. Here is one of my favourite pics from this season. We allways go hunting for a christmas-tree right before christmas. And here they are, hunting the perfect tree in deep snow, bundled up with mittens and woolen hats. :) And look at that winterwonderland!
Wish you a happy new year! see you in 2009. :)
søndag, desember 28, 2008
Look at this!!
 This is Rhonna Farrers blogbanner.
fredag, desember 26, 2008
God Jul!
 God Jul til alle mine blog-lesere. Håper dere får en fin og koselig juletid.
Merry Christmas to all my blogreaders. May you have a merry Christmas, filled with love and joy.
søndag, desember 21, 2008
Kolakaker
 Hi my friends. Want some tea and cookies? I love to bake christmas-cookies, and here is one of my favourites. Really simple, but oh so yummy. We call them Kolakaker in norwegian. you can call them caramel cookies - i think. :)
Recepie in Norwegian and english will follow. ( I'm sorry I just have the amount of ingredients in gram (european standard) not in cup and oz.
I got this yummy recepie from my wonderful mother in law, and I make them every year - this year I made them yesterday - and today they are allmost gone ..... must make more....LOL
Til de av dere som ikke kjenner meg, eller som syns det er dumt at jeg knoter ivei på engelsk på min norske blogg: Jeg gjør dette fordi jeg har mange utenlandske lesere og blogvenner. De har tidligere ytret ønske om at jeg skriver så de også forstår. ;)
Kolakaker:
150 g smør
100 g sukker
1ss sirup
1 ts vaniljesukker
1 ts bakepulver
1 ss kaffe
200 g hvetemel
* bland alt sammen
* la deigen avkjøle seg
* rull deiegn til lange pølser som trykkes litt flate på steikeplata
*Stekes på 150 grader i 12-15 minutter
* skjæres på skrå rett etter steiking.
Voila!
:)
Norwegian Kolakaker:
150 gram butter
100 gram sugar
1 tabelspoon syrup
1 teaspoon vanilla sugar
1 teaspoon baking powder
1 tablespoon black coffee
200 gram plain (wheat) flour
* mix all the ingredients
* let it cool for a little while
* make long, flat loafs on your baking paper /plate (they will flatten out and "melt" even more when baked in the oven.)
* bake at 150 degrees Celcius 12 - 15 minutes
* Cut fingerthin cookies After the loafs are ready baked - while still hot. they are soft when they are still warm - they'll get crispy when they cool of. )
* enjoy!!
So - this recepie is originally in norwegian. - I'm not sure my translation is the best - or even if it is understandable. PLEASE contact me if you have any questions. :)
fredag, desember 19, 2008
Let it snow
 Seems like the snow decided to leav Oslo before christmas this year ..... but NO worries!! I'll make my own ;) LOL If you like crocheting read on. ;)
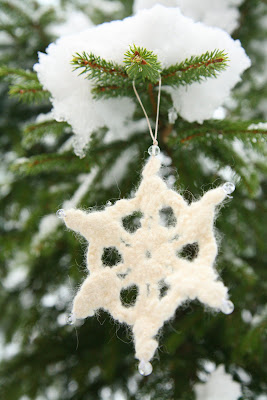 To make one of these snowflakes I used white alpacca wool (mirasol by Du Store Alpakka) and hook (european) # 3,5
rnd 1: ch 1 work 12 sc in ring, join with sl st to beg sc
rnd 2: ch 3, work ( 1 dc in next sc ) 3 times, ( ch 12, work 1 dc in each of next 4 sc ) 5 times, ch 12, join with sl st to top of beg ch-3
rnd 3: work 1 sl st in each of the next 3 dc and into first 6 ch of the 12lp, ch 3, work 2 dc, ch 3, and 3dc, ( ch 7, in next ch-12lp work 3dc, ch 3, and 3dc) 5 times, ch 7, join with sl st to top of beg ch-3.
rnd 4: sl st in each of next 2dc and into ch-3lp, ch 3, 2 dc, * ch 5, sl st in 5th ch from hook, ch 7, sl st in 7th ch from hook, ch 5 sl st in 5th ch from hook, sl st in top of last dc made, - picot made - ch 1 in same ch-3 lp, work 3 dc, ch 3, in next ch-7 lp work sc, ch 3, sc, ch 5 sc, ch3**, 3 dc in next ch-3 lp, repeat from * around. End last rep at **. Join with sl st to top of beg ch-3. fasten off.
Now you have one large, cozy snowflake. I made alot of those. When I reached the amount of snowflakes I wanted I put them all in my washing machine with a tablecloth ( to felt more) washed at 40 degrees celcius ( normal program - not wool-program!!)
shape the snowflakes while wet. You can pin the snowflake in a symetrical shape ( use plastic foam under the snowflake ) if you prefer - remove pins when dry.
I just pulled my snowflake into shape and let it dry flat.
Add a little silver-tread to make it possible to hang in the christmas tree.
I sewed glass-beads to all the 6 points of the snowflake.
voila!
And happy white christmas to all of you!
onsdag, desember 17, 2008
december daily * day 7-13 *
 Yes, I'm still here - even if I have been abit absent on my blog lately..... I enjoy my december daily album - and I really enjoy taking time making things, baking cookies and make this a magical season with my kids.
Last week a person, really dear and close to me - one that have been there for me as long as I can remember - one person that have been like a relative to me (even if she wasn't my aunt for real) suddenly passed away. This is SO sad - we cry, and it is really hard to believe something like this can happen so fast. - so this is why I have been absent - please forgive me -
But life goes on, and we try to do our best, to make this a happy season. And Here are some of the pages in my december-album:
Wish you all the best for this last week before christmas -only 7 days to go!! :)


tirsdag, desember 09, 2008
Heartgarland :)
 Hi my friends. Cold outside these days. Today it's foggy and grey here, but we have warm hearts, and a cozy time inside ;) Made this simple heart-garland to cheer up my windows. Really, easy, but I think they made my window cute and "christmasy" :)
Here is a minitutorial if you want to make one yourself :)
What you need:
patternd paper (red or whatever color you want)
corrugated cardboard
glue
(sewing-machine)
tread (as long as you want your garland to be)
A glassbead or something to embellish the end of the garland.
Tape
Heart-template (or freehand-cut your hearts)
 I used my fiskars template to draw the hearts on my patternd paper. I made 5 hearts on each garland, so I needed to cut 10 hearts to cover both forth and back of the hanging hearts.
 Cut out all the hearts
 glue 5 of the hearts (or as many hearts as you want on your garland) on to the corrugated cardboard.
 Cut the hearts out of the cardboard. Leave a "frame" of cardboard outside the patternd-paper-heart.
 Put all your hearts in a nice and tidy row on your table. Find the tread you want to use to hang all the arts onto. My tread is as long as my window is high.
Turn the hearts upside-down, (with the pattern facing down). Attach the tread to the beck of all the hearts with some tape, just to keep them in place.
Then take the remaining patternd-paper-hearts (the 5 you didn't attach to the corrugated cardboard) and glue it on top of the cardboard, on the side you attached the tread. Now all your hearts should have patternd paper on both sides, and a "heart" of corrugated cardboard, and the tread going trugh all the hearts on the inside. :) The garland is allmost ready!
 If you want to you can sew all around the hearts with your sewing-machine. That leaves a nice crafty look to the hearts.
  Have a nice decemberday!
 If you want to you can sew all around the hearts with your sewing-machine. That leaves a nice crafty look to the hearts.
I put a big glass-bead in the end of the tread thet holds the garland together, just to embellish it a littlebit, and to make it hang straight and nice.
Voila! Heartgarland is ready to cheer up your window. :)
You can of course embellish all the hearts with buttons, or whatever. I just left mine plain. :)
 Have a nice decemberday!
 mandag, desember 08, 2008
Wonderful winterday
 Yesterday was the most beautiful winterday. Everything was cold and crisp, and the white snow covered the landscape. So we decided to have a little photoshoot and just enjoy the outoors :)
Had totally fun playing and photographing. The good thing is, the kids love to have photosessions, so they are easy and fun to work with :)
 Other good news:
I am guest with my dear friend Lene and 3ndypapir at a awesome blog this month! Go check out the brand NEW scandinavian blog for paperlovers " stampARTic". The first article is up, and it is oh so beautiful and filled with loads of christmasinspiration. :)
3ndypapir are also paper-company of the month over at Scrappehuset. Thank you girls!! They have also made a awesome article with loads of inspiration. :)
fredag, desember 05, 2008
Kurs 2009 ;)
Her kommer en liten sneak peek på noen av kursene jeg kommer til å ha i 2009 :)
A little sneaky peek at some of the classes I will teach 2009. (My apologies: all the rest of the text are in norwegian.) If you have any questions about my classes, please contact me: gudrun@papirmolla.no
 Hengende hærligheter
Har du bilder som er for fine til å gjemmes bort i et album?
Har du lyst til å henge opp, og vise fram noen av bildene dine?
På dette kurset skal vi lage flere nydelige oppheng for dine favorittbilder.
Gudrun viser mange morsomme teknikker for både rammer til vegg, fritthengende ”uroer” og gjennomsiktige vindus-oppheng. Her er det masse å lære og glede seg over.
Et kurs som sprudler av skaperglede og inspirasjon.
Pris 350,-
Ta med 6-8 bilder i valgfri størrelse, ett LITE (ca 5x8 cm) bilde printet på TRANSPARENT, en gammel bok (vi skal bruke bokpermene og noen av boksidene, så denne boka må være noe du allikevel ikke vil spare på)
 Vintage minialbum:
Nydelig album i vintagestil! Her er det masse å lære! Vi boltrer oss i teknikker som maling og pussing og lager vår egen vintagepynt med blonder, bokpapir, knapper og mye annet! Dette er en perfekt gave!
Albummet kan fylles med koselige bilder og minner
Pris 350,-
(ta med 6-8 små bilder (hvis ønskelig) gjerne svart/hvitt )
 Tittel-tukkel
Er du av de som syns det er vanskelig å lage en spennende tittel på ditt scrappeprosjekt?
Eller liker du å leke med ulike typer bokstaver, fonter og tekst? Uansett kommer du til å trives på dette kurset! Her deler gudrun ideer om hvordan man kan lage kreative titler og lek med ord og ulike måter å få med tekst på sine scrapbooking-prosjekter. Vi lager en LO der bokstavbruk står i fokus.
Dette handler ikke om å kunne skrive mye, fornuftig eller lange avhandlinger, dette er kun en lek med titler, ord, fonter og bokstaver.
A little sneaky peek at some of the classes I will teach 2009. (My apologies: all the rest of the text are in norwegian.) If you have any questions about my classes, please contact me: gudrun@papirmolla.no
Har du lyst å gå på kurs med meg i det nye året, følg med på b.l.a nettsidene til Minnehjørnet i Ski og på sidebaren her i bloggen min. :)
Ønsker du at jeg skal komme til din butikk å holde kurs? Kontakt meg på gudrun@papirmolla.no
(alle kursene vist her er 3-timers-kurs)
Hengende hærligheterHar du bilder som er for fine til å gjemmes bort i et album?
Har du lyst til å henge opp, og vise fram noen av bildene dine?
På dette kurset skal vi lage flere nydelige oppheng for dine favorittbilder.
Gudrun viser mange morsomme teknikker for både rammer til vegg, fritthengende ”uroer” og gjennomsiktige vindus-oppheng. Her er det masse å lære og glede seg over.
Et kurs som sprudler av skaperglede og inspirasjon.
Pris 350,-
Ta med 6-8 bilder i valgfri størrelse, ett LITE (ca 5x8 cm) bilde printet på TRANSPARENT, en gammel bok (vi skal bruke bokpermene og noen av boksidene, så denne boka må være noe du allikevel ikke vil spare på)
Vintage minialbum:Nydelig album i vintagestil! Her er det masse å lære! Vi boltrer oss i teknikker som maling og pussing og lager vår egen vintagepynt med blonder, bokpapir, knapper og mye annet! Dette er en perfekt gave!
Albummet kan fylles med koselige bilder og minner
Pris 350,-
(ta med 6-8 små bilder (hvis ønskelig) gjerne svart/hvitt )
 Tittel-tukkel
Er du av de som syns det er vanskelig å lage en spennende tittel på ditt scrappeprosjekt?
Eller liker du å leke med ulike typer bokstaver, fonter og tekst? Uansett kommer du til å trives på dette kurset! Her deler gudrun ideer om hvordan man kan lage kreative titler og lek med ord og ulike måter å få med tekst på sine scrapbooking-prosjekter. Vi lager en LO der bokstavbruk står i fokus.
Dette handler ikke om å kunne skrive mye, fornuftig eller lange avhandlinger, dette er kun en lek med titler, ord, fonter og bokstaver.
Pris 350,-
Ta med 1-3 bilder eller flere små bilder.
Har du noe tekst, en sang, en historie eller noe du vil printe ut eller skrive på forhånd, kan du gjerne ta det med!
 Vakkert SØLV-album:
På dette kurset lager vi et unikt, vakkert minialbum der vi bruker sølvtape, gravering og eldingsteknikk. Gudrun vil også dele andre unike collage-og-distreeing-teknikker. Du vil få med deg et vakkert vintage-inspirert album du kan fylle med bilder og minner. Dette kan også bli en super gave til noen du er glad i.
Pris 350,-
Ta ev. Med 6-8 bilder (gjerne svart-hvitt)
 Lag-på-Lag med papir, maling og pynt
På dette kurset lærer gudrun bort en av sine favoritt-teknikker: LAG-PÅ-LAG.
Her er mulighetene uendelige, og scrappelysten får frie tøyler.
Vi skal innom flere ulike teknikker, og det blir plenty med ideer og tips på veien.
Vi lager en scrappe-side (en LO) som vil bugne av skatter og scrappeglede.
Pris 350,-
Ta med 1-2 bilder str. 10x15
 Clearalbum:
Vi lager et flott minialbum der vi bruker gjennomsiktige sider, mange morsomme teknikker, lure ideer og løsninger.
Her viser Gudrun mange ulike måter å dekorere, feste bilder og lage smarte peek-aboo-sider i et clear-album.
Dette blit et lekkert minialbum du kan fylle med koselige bilder og minner.
Fint som gave eller bare til deg selv.
Pris 350,-
Ta med:
6-8 bilder str. 10x15
Ta med 1-3 bilder eller flere små bilder.
Har du noe tekst, en sang, en historie eller noe du vil printe ut eller skrive på forhånd, kan du gjerne ta det med!
 Vakkert SØLV-album:
På dette kurset lager vi et unikt, vakkert minialbum der vi bruker sølvtape, gravering og eldingsteknikk. Gudrun vil også dele andre unike collage-og-distreeing-teknikker. Du vil få med deg et vakkert vintage-inspirert album du kan fylle med bilder og minner. Dette kan også bli en super gave til noen du er glad i.
Pris 350,-
Ta ev. Med 6-8 bilder (gjerne svart-hvitt)
 Lag-på-Lag med papir, maling og pynt
På dette kurset lærer gudrun bort en av sine favoritt-teknikker: LAG-PÅ-LAG.
Her er mulighetene uendelige, og scrappelysten får frie tøyler.
Vi skal innom flere ulike teknikker, og det blir plenty med ideer og tips på veien.
Vi lager en scrappe-side (en LO) som vil bugne av skatter og scrappeglede.
Pris 350,-
Ta med 1-2 bilder str. 10x15
Vi lager et flott minialbum der vi bruker gjennomsiktige sider, mange morsomme teknikker, lure ideer og løsninger.
Her viser Gudrun mange ulike måter å dekorere, feste bilder og lage smarte peek-aboo-sider i et clear-album.
Dette blit et lekkert minialbum du kan fylle med koselige bilder og minner.
Fint som gave eller bare til deg selv.
Pris 350,-
Ta med:
6-8 bilder str. 10x15
torsdag, desember 04, 2008
Miracle
 Finally I got to post pictures of my advent / december-album. I decided to dedicate my album to this weeks word over at the "One Little Word"-blog: MIRACLE
This season is so filled with small everyday-miracles, magic, traditions and happy little memories. Two years ago I made a album made just for december, and as I looked trough this album I realised how much this little book actually ment to me - so I decided to make a decemberalbum this year too. I then stubbled into Ali Edwards blog and found she is hosting a "december daily" album. - so inspiering and fun!!
Here is the first pages of my album. Sol lit the first light this year, and it was definately a miracle for her.....here at our house the christmas / advent-season starts the moment the first candle is lit. The blocks are the poem we say for each light.

 Oh, and one more thing to tell: TOVE is desember GUEST over at the 3ndyPapir-blog, please come look at all the goodness she is sharing with us over there! :)
onsdag, desember 03, 2008
smart card :)
 Had a demo over at Bikuben the other weekend. And one of the card I made was this one. Love the Idea of being able to put something more into the card, so it is made with a pocket inside.
Here is how I made it:
 1. Used patternd paper "julekrans" by 3ndypapir.no design Lene Solhaug. Cut the paper in half. The good thing is you can make two similar cards out of one paper. :)
 2. Folded the paper in three. The part that are ment to be the pocket is 3,5 inch (9 cm) and is abit smaller than the the two other parts.
 3. cut or punch a half circle in the top of the pocket.
 4. glue the pocket down.
 5. draw along the edges of the pocket and along the inside-page of the card with a black pen.
 6. fold the card and draw along the edge of the frontpage of the card too.

 7. assemble all the embellishments for the front of your card.
 8. I sprayed my tag with loads of glimmermist (sandy beach) Crumbled the tag and let it dry.
 9.When the tag is dry, attach all the embellishments onto the card.
 10. Now we are ready to embellish the pocket inside the card. I cut a piece from the patternd paper "god jul" by 3ndypapir, design lene solhaug. I folded the paperstrip to make it look like a folded ribbon and glued it onto the pocket. Embellished with a feltheart, a minitag, a button and two beadhead-pins. The pocket is perfect for a tiny chocolate, a gift-card, tickets or whatever you want to give away. :)
 A nice little gift, and a beautiful card for neighbour, friends or family.