Recent Posts

onsdag, mars 24, 2010

Me, a scrapbooker :)

Yes, I scrap!
Somethimes I just wonder....if I scrap, or if I just teach, run 3ndypapir, mail bunches of papers all over the world, surf internet, talk to people on mail...
Well I LOVE this part of my job, of course!!! But most of all i want to be a scrapbooker, an artist - a photographer...a paper-lover :)
And it feels GOOD when I find time to do the things I love the most.
Here are three LOs I made recently.
One with the BEAUTIFUL butterly stamps by my Stamp BOX (love these!!)
And the two LOs below are made for LOTUS paperie.
This awesome challenge-blog that recently closed. SO sad! :(
Used patterned paper by 3ndypapir, and the CUTE heart-stamps by Ett Trykk.
textbox by mme.
On the LO below I used my chipboard-snowflakes and thickers-alpha as mask, and spritzed with my favorite turquouse glimmermist by Tattered Angels.
Snowflake-stamps by my Stamp BOX :)
Thanks for popping by!!
:)

mandag, mars 22, 2010

Easter inspiration :)

Hi my friends, and happy inspiration monday. :)
I have made some cute little greeting-cards, and a tiny little chocolate-gift today.

Easter is just around the corner, and I guess friends and family will love to get a little card or some sweets to remind them we are thinking of them even if we are miles and miles apart.
:)
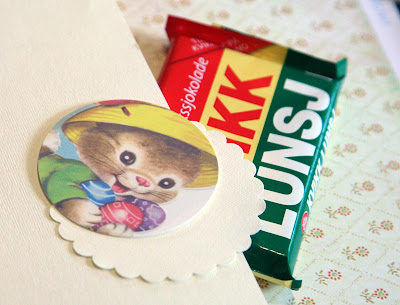
I have dressed up a little chocolate.

This chocolate is a typical norwegian chocolate, and most of us are thinking of cross country skiing, snowy mountains, oranges and hot cocoa when we see this chocolate.
Well for us norwegians, a perfect choice for easter. :)

I have dressed mine up a little bit, to make it more festive.
:)

For this project I've used
white cardstock
a scallop border-punch
a round and a scallop round ( 2 1/2 and 3 inch) punch
ribbon and green leaves and paper-flowers to mebellish
3ndypapir "secret garden" collection patterned paper
and a scan of an old easter postcard.

(You can download the images I have used for my projects by clicking on the images in this post and save. )
These images are for personal use only!!!

I punched a circle out of the bunny-card and a round scallop of the white cardstock.
Attached the round card to the scallop background and drawed around the circles and scallops with my favorite brown pen.

Cut a piece of white cardstock that will fit as a "coat" around the chocolate.
Adorned the edges of my cardstock with my scallop-punch.

Cut two pieces of patterned paper to put on top of the white cardstock-"coat".
The red patterned paper is just to add a little red border on each side of the lighter patterned paper.
Attach the patterned paper on top of the cardstock.
Fold the cardstock-"coat" around the chocolate and fasten it on the back side.

This is now a perfect coat for the chocolate.
Adhere the circle with the cute postcard on top of the paper-"coat".
embellish with paper-flowers and a piece of ribbon.
So simple and easy, and
Perfect as a cute little gift.
:)

Here are the two easter-cards I made today as well.
Hope you feel inspired.
Have a wonderful week!

fredag, mars 19, 2010

Classes

Hi my friends
Hope you have had a wonderful week.
My week has been busy, busy, but fun.
Still working on shipping all the packages of 3ndypapir to all the retailers around Norway, Sweden, Iceland etc.
I have had alot of classes this week too - one every second day :) I love to teach, so these scrapbooking-and papercrafting classes makes me all happy.
Last weekend I attended the large Crop / gathering in Ski, and I had a blast, teaching, scrapbooking laughing, being with friends. GOOD TIMES!
:)
I had one class at Minnehjørnet early this week, and I will have one class at Steffens tomorrow.
Yesterday I went to Moss, I had so much fun teaching for a group of wonderful people there :)
They all wanted me to put out pictures and templates for the stuff we made in this class.
So without further ado, here it goes.
ENJOY!!
:)


I have put alot of love, time and effort into all my creations and templates.
Some of the templates are made by me, and some are other peoples work of art.
These templates are for PERSONAL USE ONLY!
Please don't use them for magazines, books or other commercial use without permission!
All papers used for these projects are by 3ndypapir
:)


mandag, mars 15, 2010

inspiration monday

Hi my friends.
Hope you are all fine.
I have been so busy with the 3ndypapir spring release this week - so sorry I just left you with the sneak-peeks last monday...
Anyhow I'll make up today and share a super cute minialbum tutorial with you.
This minialbum is a paperbag album, and I used the new "secret garden" collection by 3ndypapir.
If some of you, my friends in US or other places in the world want to purcase this collection, please contact me by e-mail:
and while waiting, please join my inspiration monday.
enjoy!


For this project I have used small paperbags size 7 cm X 20 cm.
I bought these at Minnehjørnet, but I guess you can get them in your favourite LSS or online.
All patterned papers are 3ndypapir
a ribbon to tie around the book
overlay by Hambly
dymo text
crocheted embellishments bought on Etsy


I put all my 3 paperbags in one stack and sew them together using my sewing machine.
I stiched forth and back, to secure the bags. This stiched line will be the "binding" of the book, and after I stiched it looked like this:


Now I attached the ribbon around my book.
I glued my ribbon to the front and back to make it stay in place.

I Cut 12 pieces of patterned paper size 9,5 cm X 6,5 cm
to cover all the book-pages and the cover.

I attached all the pieces of patterned paper to my bookpages, and used my "markedsdag" tag-paper (3ndypapir), my hambly-tag-overlay, crochet-flowers and ladybugs to embellish the pages and added titles using my Dymo.
I was SO inspired by my friend Lene to use black against all the bright colors.
Thank you Lene - you are amazing! :)

VOILA!
The book is ready, and I added my pictures.
I decided I wanted this to be a book about Eiruns passion for crocheting.
I added some pictures and some tags to the pockets.
And here is how my book turned out:


Thank you for visiting my blog!
Hope you enjoyed this inspiration monday.
And please give me a link if you make a mini inspired by this. I would LOVE to see you work of art!!
Have a wonderful week!!
xo

onsdag, mars 10, 2010

3ndypapir "secret garden"


Drumroll!
The new summer collection by 3ndypapir is here.
I'm so happy and excited to show you this summer line, filled with fresh fruit, retro-vintage summer-memories, flowers and butterflies.
For a closer look at each design please come on over to the 3ndypapir blog.
:)

mandag, mars 08, 2010

sneaky peek ;)

I'm SO, SO excited about the NEW summer-collection by 3ndypapir.
Here is a little sneak peek for you. Hope you like it!
The papers are off to print, and will soon be ready to ship :) :)

tirsdag, mars 02, 2010

Cookies for you :)

Hi my friends.
Hope you are all fine.
Thank you SO much for all your kind, encouraging and wonderful comments on my last blogpost.
You all made my heart smile
:)
It is tuesday today.... This week is the most busy so far in 2010.
I'm working all day and all night with new designs
so please stay tuned ;)
And - yes, please forgive me yesterday ran by too quickly.
I'll leave you with some cookies and one of my favorite giftboxes, made using some of my favorite patterned paper ;) ;)


A delectable treat that can be rustled up quickly and eaten almost straight from the oven.

Ingredients
100g/3½oz good dark chocolate
125g/4½oz unsalted butter
100g/3½oz granulated sugar
75g/2½oz soft brown sugar
1 egg
2 tsp vanilla sugar
150g/5¼oz plain flour
(I use at least 75g/ 2 1/2 oz rolled oats instead of half of the the flour)
½ tsp baking powder
a pinch of salt


Method
1. Heat the oven to 190C/375F/Gas 5. Line two baking sheets with baking parchment. Chop the chocolate into little chunks and set aside.
2. Heat the butter in a small saucepan very gently until it has just melted. Meanwhile, put the two types of sugar into a mixing bowl. Pour the melted butter on top of the sugars and beat well with a wooden spoon.
3. Add the egg and the vanilla and beat until well blended.
4. Sift the flour, baking powder and salt into the mixing bowl and stir them in, then add the chopped chocolate.
5. Dot heaped pudding spoonfuls of the mixture over the lined baking sheets, leaving plenty of space in between them--they really spread out while baking.
6. Wearing oven gloves, put the baking sheets in the oven and bake for 8-10 minutes, until the cookies are just turning golden brown. (If you have a glass door on your oven, watch the extraordinary transformation as these cookies bake--one moment you've got lumpy brown dough, the next, you have pale golden cookies, their shiny surface a network of cracks.)
7. Leave the cookies on the baking sheets to harden for a couple of minutes, then carefully lift up the baking parchment and transfer them to a wire cooling rack.
8. You can eat these cookies warm, but they are also good cold, and they store well in an airtight tin.

:)


Make a giftbox like the one above. Add cookies or some other good stuff - and VOILA, you probably made the day for the person you decided to give the box filled with some heavenly good cookies.
:)


Happy creating!!
And thanks for popping by!
:)